Disk Label Presets
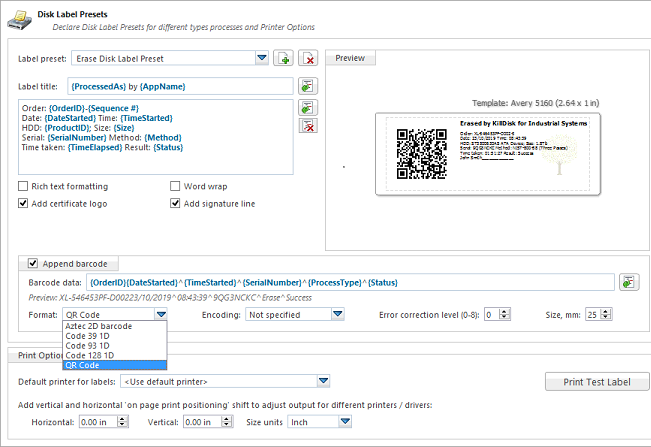
Disk Label Presets section allows to adjust label settings for the KillDisk. Labels can be formatted for any printer, page or label type using KillDisk highly customizable labels' formatting features.
Label preset
Displays and let you select a default Label Preset or create a new one. Click Add New Label Preset button  to create a custom label preset with your own specifications. Click
Delete button
to create a custom label preset with your own specifications. Click
Delete button  to delete the
selected label preset .
to delete the
selected label preset .
Label title
Sets a title to be printed (in bold) at the top of the labels. It can be a company name, batch name or any other descriptors you may
consider useful to identify the operation. Static text can be typed in or any dynamic attributes (tags) can be inserted at current
cursor's position. Click Insert Name Tag button  to insert predefined tag from the drop-down list.
Label area
Label's content for the preset. Static text can be typed in or any dynamic attributes (tags) can be inserted at current cursor's
position. Click Insert Name Tag button to
insert predefined tag from the drop-down list. Click Clear Pattern button to empty all label's area.
Label attributes
You can use RTF formatting and set Word Wrapping behavior using related check boxes.
- Add signature line
- Adds a line at the bottom of the label for the technician to sign off on upon completion of the operation.
- Add certificate logo
- Includes the logo used in the certificate as a label's watermark background.
Label preview
Displays a preview of the label with the current input settings. Refreshes automatically when any adjustments are made to the settings.
Barcode options
Selecting Append barcode check-box will print QR Code or Barcode on the label to be able to be scanned thereafter for third party inventory database
- Barcode data
- String including essential erase parameters to be encoded and transformed to QR Code or Barcode. Static text can be typed in
or any dynamic attributes (tags) can be inserted at current cursor's position. Click Insert Name Tag
button to insert predefined tag from the drop-down
list.
- Preview
- Displays a preview of encoded string with the current input settings. Refreshes when any adjustments are made to the settings.
- Format
- List of supported QR Code and Barcode formats. Currently supported: Aztec 2D barcode, Code 39 1D, Code 93 1D, Code 128 1D, QR Code. Note that different types of Barcodes can accept different size of encoded string.
- Encoding
- If barcode string contains symbols other than English letters, you can specify encoding (code page) for the particular language.
- Error correction level
- The lower the error correction level, the less dense the QR code image is, which improves minimum printing size. The higher the error correction level, the more damage it can sustain before it becomes unreadable.
- Size, mm
- Size in millimeters for the Barcode/QR Code to be printed on the label.
Print options
Define options for label printing including special label printers (Brother QL-700, etc):
- Default printer
- Define printer to be used exclusively to print labels from the list of installed printers.
- Print output adjustments
- The print output adjustments section of the dialogue allows you to vertically or horizontally displace the position measured in specific print units to adjust to different printers.
Print test label command let you print Disk Label sample to verify your settings and selected layout attributes.
Disk Label Templates
Disk Label Templates section defines set of predefined label templates for usage in different scenarios.
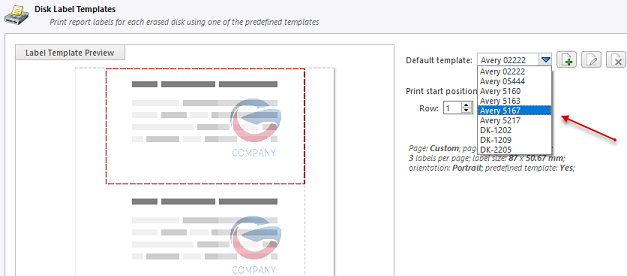
Disk Label Templates dialog gives you an access to a number of predefined standard templates and to any custom
templates you can create. These templates may be easily selected without opening any additional dialogs. The details of the selected
template are displayed below the selection box. If your custom labels differ from any of the templates available, the button allows you to create a custom template with your own
specifications. Additionally, the  button allows you to modify an
existing template and the button deletes the selected
template.
button allows you to modify an
existing template and the button deletes the selected
template.
Print Start Position
The Print Start Position section of the dialogue allows you to select the starting position of the label on the page to print from. The printing won't always start from the 1x1 position, so you can adjust this setting accordingly.
Creating a New Template
To open a Template Editor, click the button on the Disk
Label Templates dialog .
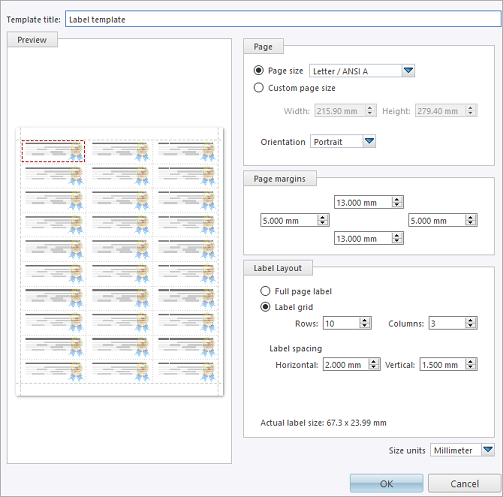
- Template title
- Sets a custom title for your template. This is the name to refer this template when selecting it in the Print Label dialog.
- Page
- Specify the dimensions of the page being used to print the labels. Select page size from the list of standard sizes or define custom size using exact measurements. Define page orientation.
- Page margins
- Page margins are defined for the top, bottom, left and right sides of the page.
- Label layout
- Define how the labels appear on the page. Define the spacing in between labels on the page and the dimensions of the label grid. Once you entered the proper measurements, KillDisk takes care of all formatting.
- Size units
- The units of measurement may vary between millimeters, inches, pixels and points. If a value is entered in one measurement and then size unit is changed, the appropriate conversion takes place.